


How to Power Supply Raspberry Pi 4 and 5: Do’s and Don’ts Guide
Have you recently gotten a new Raspberry Pi 4 or 5 and find yourself uncertain about powering it up? With a multitude of development boards available, each with its unique power requirements in terms of voltages and current consumption, the process can be confusing. This article aims to guide you through various methods to know how to power a Raspberry Pi, whether through its ports or GPIO pins.
How to Power a Raspberry Pi 4 and 5
Three methods for powering up your Raspberry Pi and requirements:
1- Powering the Raspberry Pi via the USB-C (5V, 3A)
How to Power a Supply Raspberry Pi 4 and 5: Dos and Don'ts Guide.
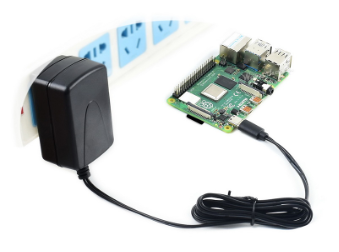
The primary, suggested, and most straightforward method to supply power to the Raspberry Pi 4 involves utilizing the USB-C port located on the side of the unit. The recommended input voltage for this approach is 5V, accompanied by a suggested input current of 3A.
Avoid using USB-C mobile chargers, as they do not deliver stable power as effectively as official power supplies. Using them may result in performance drops or OS crashes. Therefore, we consistently recommend using the Official Raspberry Pi 4 Type-C Power Supply Adapter for anyone looking into how to power a Raspberry Pi safely.
2- Powering the Raspberry Pi via GPIO pins (5V and GND pins)
How to Power Supply Raspberry Pi 4 and 5: Dos and Don'ts Guide Picture3 1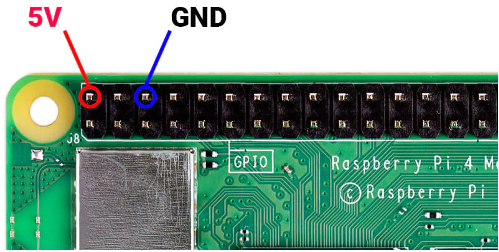
An alternative technical method to energize your board, albeit a risky one, involves directly connecting a stable, regulated 5V supply to the GPIO pins. It’s important to note that there is no fuse protection or voltage regulator in place to safeguard the board from overvoltage or current spikes. This is one of the advanced ways to understand how to power a Raspberry Pi without using the standard port.
(How to Power Supply Raspberry Pi 4 and 5: Dos and Don'ts Guide Picture 4 1)
Incorrect voltage supply or current spikes have the potential to harm your Raspberry Pi. This damage may result in the burnout of some or all of the GPIOs, and in extreme cases, it could lead to the complete FRY of the entire Raspberry Pi.
We recommend using this method of powering up the Raspberry Pi if it is achieved through a protected source. For instance, you can utilize a Raspberry Pi Power HAT, which already includes proper regulation onboard.
3- Power over Ethernet (PoE)
(How to Power Supply Raspberry Pi 4 and 5: Dos and Don'ts Guide Picture5 1)
Power over Ethernet, or PoE, is a popular way to provide power to devices. It uses the spare wires in an Ethernet cable to send both data and electricity. This method is handy for powering devices like Raspberry Pis. Currently, the Raspberry Pi 4 Model B and Raspberry Pi 3 Model B+ officially support Power over Ethernet, but other models may work with a third-party adapter.
To power a Raspberry Pi using Ethernet, you need a PoE HAT. You can use the original Raspberry Pi PoE HAT or the newer Raspberry Pi PoE+ HAT, which can deliver more power. A recently launched version of the PoE HAT is now available for the Raspberry Pi 5.
Now, how can you determine whether your Raspberry Pi is successfully powered or not?
Successful Powered Raspberry Pi
By observing the red light on your device, you can assess whether it is receiving power and also determine if the power supplied is adequate.
- A continuous red light signals that your Raspberry Pi is receiving sufficient power, ensuring safe operation and correct performance.
- On the contrary, if the red light is blinking, it indicates that the power supply is not delivering enough voltage. For the Pi to enter this state, the voltage must fall below 4.64 volts.
- In the event that the red light remains off, it signifies inadequate voltage delivery, leading to a “brownout.” In this state, the Pi remains off to prevent damage caused by insufficient power.
When learning about how to power a Raspberry Pi, it’s crucial to understand that if your Raspberry Pi board has a short circuit or a sudden increase in electric current, it could damage the power management circuits (ICs). You’ll notice there’s a problem if the green indicator light doesn’t blink or turn on.
Power Supply Raspberry Pi - What Not to Do?
- Don’t shorten the header pins of the Raspberry Pi directly to each other! This commonly occurs during measurements with multimeter probes or when placing the Raspberry Pi board on a conductive surface, such as metal. To simplify connections, use the Raspberry Pi GPIO Expansion Shield. It streamlines wire handling, but be aware that it doesn’t guarantee absolute safety. There’s still a chance of unintentionally wiring things incorrectly and shorting pins on the breadboard. So, exercise caution when wiring and connecting.
- Don’t short the 3.3V pins with GND pins! To supply power to the Pi, you use 5V through the micro USB connector. But where does the 3.3V come from? It’s generated by an onboard voltage regulator. Be cautious not to accidentally connect these 3.3V pins to the ground because doing so can swiftly damage the voltage regulator. Since the processor relies on that 3.3V, it can essentially fry your Pi.
- Don’t short the 5V pins with other pins! The two 5V pins are commonly employed to power externally connected hardware, which is perfectly acceptable. It’s likely that you’ll connect and utilize these pins. Just ensure that the 5V doesn’t directly connect to any other GPIO header pins. The same caution applies to 5V from other outside sources.