
Raspberry Pi Visual Studio Code: Remote Coding Setup Guide
Do you always find it hard to program and code on your Raspberry Pi? Do you need to connect it every time you need a display, keyboard, and mouse? Well, here’s the solution! After this guide, you can use only your PC for everything. Just power up your Raspberry Pi, and let your PC handle it. We’ll be using something called SSH to make this happen. But what’s SSH?
What Is SSH?
Secure Shell (SSH) is a network communication protocol that enables two computers to communicate. And for our luck, Raspberry Pi OS has a built-in feature that allows us to enable SSH with simple steps.

How to Set Up Raspberry Pi Visual Studio Code
1-Enable SSH on the Raspberry Pi
First, we need to open “Terminal” if we are using “Raspberry Pi OS with desktop” or just start typing the commands if we are using “Raspberry Pi OS Lite.” Enter sudo raspi-config. This command will show you all the available options. Now, with the arrows, select “Interfacing Options,” navigate to and select SSH, choose Yes, and select Ok.
2-Install the Extensions on VS Code
To begin using Raspberry Pi Visual Studio Code, install the necessary extensions. Visual Studio Code offers a lot of extensions, and to install any extension, we have to click on the extensions button and then search for “Remote – SSH” and it will show up, click install to install it.
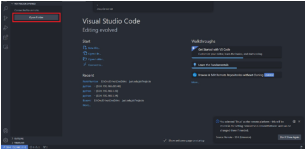
3-Add Raspberry Pi IP to SSH
Once you’ve successfully installed the extension, you’ll notice a new section dedicated to it. Go to this section and select the small ‘+’ button to incorporate a new host.
4-Enter the SSH Credentials
You will be prompted to provide the SSH connection command. If your Raspberry Pi is running the Raspberry Pi OS, the username is typically ‘pi’. Also, you can type “raspberrypi” instead of your IP. Once you have entered the connection command, as illustrated below, press “Enter”.

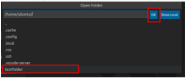
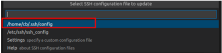
5-Select the Configuration File
SSH keys need to be stored on your local file system, and VS Code will inquire about your preference for their location. I opted for the .ssh folder under my user directory, as depicted in the image. Then, you will see a notification that says ‘host added!’
You will see a notification that says ‘Host added!’
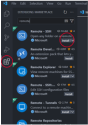
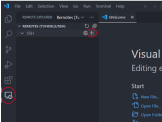
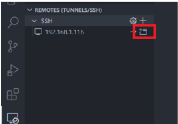
6-Establish a Connection with Your Raspberry Pi
You should be able to see your Raspberry Pi listed under the ‘SSH’ on the left side. Click on the small folder icon to connect to your host. You’ll be prompted for the password; enter it and then press ‘Enter’.
You’ll be prompted for the password; enter it and then press ‘Enter’.

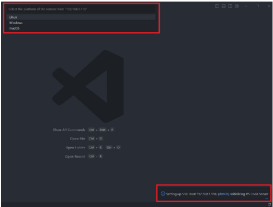
VS Code will ask you to select the OS of your Raspberry Pi, which is Linux, and then it will inform you that it is installing ‘VS Code Server’ on the Raspberry Pi, which is necessary for synchronization between the development environment and its file system.
7-Navigate Through Your Folders
Click ‘Open Folder’ to show all your folders, then choose one to start coding in.